Extracting layers into new images for all screens just became so easy in Photoshop!
Today, Adobe updated almost all of their creative apps including Photoshop. If you are a designer or developer who has ever needed to slice out assets from a PSD design to use in a website or mobile app, this update is going to give you hours (or days) of your life back.
A while back, Photoshop introduced Generator to automatically create new assets if you named your layers correctly. This interface wasn’t particularly friendly. Now, the new “Extract Assets” feature puts an easy to use face on the generator technology.
Here are the simple steps to getting new image assets from a PSD using the update of Photoshop CC including Extract Assets:
1. Open your PSD design.
2. Select all the layers you want to create new images from.
3. Right click and select “Extract Assets”.
4. In the dialog select all the resolutions you want created, add or delete layers from your asset queue, manage names and settings.
5. Apply the settings and ALL of your assets are created at once (no need to repeat any steps).
How to Move From Project Parfait to Adobe’s Creative Cloud
As of today, the functionality of Project Parfait is available in Adobe’s Creative Cloud as “Extract”. The functionality and UI should feel totally familiar to Parfait users. We want Parfait users to transition over to using Extract in Creative Cloud as soon as possible, so, here is some information that should help you out.
- You do not need a new login for Adobe’s Creative Cloud. The login you used for Project Parfait should work when you go to http://creative.adobe.com/files. All Adobe accounts (including free ones) can use Extract.
- You can continue to use Project Parfait until at least September 30, 2014. After that date, the service in Project Parfait will be discontinued.
- You can download PSDs uploaded to Project Parfait until September 30, 2014. In the Files view of Parfait, hover over a thumbnail and click the down arrow.

- All the functionality of Project Parfait will exist in Extract. In addition, you will be able to share a PSD with someone else via a public URL. Using this public URL, the recipient can use Extract right away. No login will be required.
Using Extract in Adobe’s Creative Cloud
1. Go to http://creative.adobe.com/files (You will likely be asked to login, if you have not logged in already.
2. Upload a PSD to the Creative Cloud by dragging your file into the Files view of Creative Cloud.
3. Click on the PSD file after upload is complete.
The Extract tab should be activated and you will see a view similar to Project Parfait.
If you want more information regarding Extract, visit one of the following links below:
Help Page: http://helpx.adobe.com/creative-cloud/help/extract-css-images-psd-files.html
FAQ: http://helpx.adobe.com/creative-cloud/help/extract-css-images-psd-files.html#FAQ
Ask a question by visiting our forum: https://forums.adobe.com/community/extract-for-psd
Note: All new users to Project Parfait will be redirected to use Extract in the Creative Cloud.
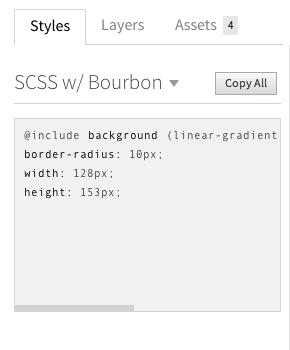
Using preprocessors in Project Parfait
We had a recent update to Project Parfait where we added support for the first preprocessor, SCSS/Bourbon. We plan on adding other preprocessors, but, wanted to get people’s reaction to this workflow and feedback on what is used the most.
To use a preprocessor, go to the Styles tab in Project Parfait. By default, the CSS Inspector displays plain CSS. Mouse down on the down arrow above the CSS Inspector to change to a preprocessor.

That’s all. Your CSS inspector should reflect this change.
Can I share a PSD from Project Parfait?
In Project Parfait’s in-app chat, I’ve been reading through all the feedback and trying to respond to people’s requests and problems. One question that has come up a lot is, “Can I share my PSD from Project Parfait?”. I’ve answered this question at least a dozen times, so, I thought I’d post an answer here for anyone looking for it.
Right now, Project Parfait does not support any collaboration features like sharing. So, if you are a designer wanting to share a PSD with a developer through Project Parfait…. you can’t really do it. You will need to send the PSD to the developer and they will need to upload to their account to take advantage of measurements, CSS and assets outputted by the tool.
However, sharing and collaboration is on our radar and we plan to have this in the next few months.
5 Things Made Easier with Project Parfait
This week, we launched a new service in my organization called Project Parfait. Here are a couple of the things you can do with Project Parfait that hopefully make a front end developer’s life easier:
1. Get Measurements from a PSD.
No more ruler tool or using the marquee tool in PS to eyeball the distance from the top of your site to your logo!
In Project Parfait, you can SHIFT+CLICK two elements on your canvas and get the relative distance between them. Here, I have selected the main document and the top header. The measurements in Project Parfait show me a top margin of 134px and left margin of 349px. While the tool only gives you pixels right now, we want to support % and ems soon.

2. Get the CSS for a Gradient
In PS, some people just use the colorpicker to grab colors from the top and bottom of a gradient. But, what if the gradient actually has more stops than that? There are other ways to get all the colors, but, in Project Parfait, it’s one step.
Select the element with the gradient and see the CSS in the CSS Inspector. This example had three gradient stops.

You can also get vendor prefixes by clicking on the checkbox “Show vendor-prefixed CSS”.

3. Determine your CSS classes for font styles from a PSD design.
In Project Parfait, you can see, at a glance, what fonts, sizes and weights are being used throughout the design you’ve been given. This is displayed in the Styles tab:

By clicking on any of the font sizes, you will get an indicator in your design where this font style will be used as well as a pop up with the CSS.

This allows you to write a CSS class like:
.activityTitles {
font-family: AmaticSC;
font-size: 24px;
font-weight: 700;
}
4. Create assets from a single or multiple layers.
From the canvas or the layers tab, you can select the layers that you want to make an image asset from. For example, in this design, I may want this kayaking man icon and the circle behind it. So, I’d select both.

After making this selection, I would click on the download arrow icon in the blue popup box. This will extract your asset and you can see it in the Assets tab.

From the Assets tab, you can click on any image to download it to your local machine once you have verified this is the image you want.
5. Get Inline text CSS styles
In some PSD designs, you will have one text layer with multiple styles. If you try to pull the CSS from PS, you will only get the first set of styles for that layer. If you select a text layer in Project Parfait that includes more than one set of styles, the CSS inspector will give you the “inline” styles. Here is an example:

When you copy the CSS, you’ll get something like this which you will need to break out into separate classes:
font-family: “Source Sans Pro”;
color: #0b0a0a;
font-size: 36px;
font-weight: 700;
line-height: 1;
font-family: “Source Sans Pro”;
color: #ed0505;
font-size: 18px;
font-weight: 700;
line-height: 2;
width: 97px;
height: 99px;
This is probably not the ideal format, but, hopefully, our users will tell us how they would like inline styles formatted.
Wrap text around an image in Edge Reflow
I am reposting a great little Adobe forum response from Christopher Bank about how to get text to wrap around an image in Edge Reflow without using CSS Regions.
The first step is to draw a box, and then add an image at the top and then add a text box below that. You can set the width to auto and it will fill the whole box.

After that select the text and make it “float:none”, set the margins to 0, and make sure the clear is none (no buttons selected).

The last step is to change the image to float: right

That should do it. After that you might want to turn the div into a group so it’s easier to move everything as whole. If you try to move the image or text using drag and drop it’s likely the text will go back down below the image again.
Preview 7 makes it easier to explore Edge Reflow
Today, we launched an update of Edge Reflow. We recently took a step back and analyzed some of the problems that our users were facing. We found that it was really tough to use Reflow, at the beginning. Once you overcame some of the learning hurdles, you saw the value of creating responsive designs in this environment. But, honestly, a lot of people were just never passing the initial learning obstacles. In the our current release, we hope that a couple of things will ease learning to use the tool. First, we added a sample project that opens with your initial launch of Edge Reflow.

This sample project allows you to explore the various media query breakpoints at 480px, 768px and 960px by clicking on them. The project uses most of the functionality that Reflow has to offer including background images, different types of positioning (fixed and static), borders, text styles, form elements, linking etc. I think the only thing it doesn’t have is multiple pages. Maybe we’ll add this in a future release.
The project also acts as a place to find new content to help you learn, outside of the software itself. If you view the project in the browser, or preview it, by pressing the TAB key, you will be able to click on external links that go to places like tutorials, issue lists, Twitter and Facebook pages. The links don’t work while you are in “design” mode for your project.
This project will not open the second time you open Reflow, so, if you would like to see it again, go to your Help menu and find “Open Welcome Project”.
 We hope this helps you to learn how to use Reflow. Let us know what you think via twitter: @Reflow.
Send an object to the front or back in Edge Reflow
In the past week, someone asked on our user forums how to send an object to the front or back in Reflow. In Reflow, as elements are placed on the canvas, their default position value is “static”. When items are position: static, they do not support the z-index property which determines stack order.
To change the stack order of elements in your Reflow design, you must first change the position property from static to “absolute”, “relative” or “fixed”. You can do this in the Layout -> Advanced pane.

Once your element is fixed, absolute or relatively positioned, you will see options in this pane for z-index.
![]()
Click on the first button to push an element back in the stack order. Or, click the second button to send the object back in the stack order.
Push a style to all breakpoints in Edge Reflow
While working on a responsive design in Reflow. You may find yourself styling an element while you are in one of your breakpoints. For example, you may have added a background color and image to a box while in your 350px breakpoint like this:

However, you actually want all of these styles on the default breakpoint. To push these styles to the default breakpoint, hover over the right edge of each style. You should see a button show up looking like this: ![]() . Pushing this button next to a style will push that region specific style to all breakpoints.
. Pushing this button next to a style will push that region specific style to all breakpoints.

Turning on CSS Filters and CSS Regions in Edge Reflow
Because CSS Filters and CSS Regions are not yet supported in all the browsers, Edge Reflow doesn’t have support for them turned on, by default. To use CSS Filters or CSS Regions in the tool, you need to go to the menu item: View -> Shiny Web Features. You will get the following dialog describing these features.

Turn these features on.
Now, you will be able to use CSS filters at the bottom of your Styling tab for any element on your canvas.

Or, you will be able to use CSS Regions which I have a tutorial for in an earlier blog post.

